こんにちは!
冷たい麺が美味しい季節になりましたね。
今日はそうめん、明日はうどん、明後日は…そうめん!
クラウドソリューション開発部の今野です!
「うわー…。」
ガタンゴトン。
ゴソゴソ。
電車の中。家の鍵が見つからない。
どこを探しても見つからない。
困った。
こんな時に予めセンサーをつけておいて、どこに落ちたかわかるようにできたら便利ですよね。
「iBeacon」というデバイスを使うことでそれが可能になるんです。
iBeaconとは?
Apple社が開発した通知システムです。ビーコンというぐらいなので、いつも「僕はここにいるよ!」とアピールしてくれる仕組みになっています。
それをデバイスに埋め込んで活用されている例が多くあります。
例えば、自動販売機に近づいた時にLINEにクーポンのお知らせが来たり、落とし物をしないようにタグのような形で使われていたりしています。
そこで!
今回はiBeacon使って、iBeaconがどこにあるかをスマホで発見できるようにします。
が、みなさん手元にiBeaconがない可能性大なので、スマホをiBeaconと化します。
ここでは、スマホ(検知用)と落とし物スマホ(iBeacon)を作ってみましょう!
落とし物スマホ(iBeacon)を無事見つけられたら…OK!
スマホ(検知側)
ContentView.swift
1.UI表示用のファイルを作成します。
|
1 2 3 4 5 6 7 8 9 10 11 12 13 14 15 16 17 18 19 20 21 22 23 24 25 26 27 28 29 30 31 32 33 34 35 36 37 38 39 40 41 42 43 44 45 46 47 48 49 50 51 52 53 |
import SwiftUI import CoreLocation struct ContentView: View { @StateObject private var detector = BeaconDetector() var body: some View { VStack(spacing: 20) { Text("ビーコン探知中") .font(.title) .padding() Text(proximityText(detector.distance)) .font(.title2) .foregroundColor(.blue) if detector.accuracy >= 0 { Text(String(format: "推定距離: %.2f m", detector.accuracy)) .font(.headline) } else { Text("距離を計測中...") .font(.headline) } Button(action: { detector.startScanning() }) { Text("スキャン開始") .padding() .foregroundColor(.white) .background(Color.green) .cornerRadius(10) } } .padding() .onAppear { detector.startScanning() } } func proximityText(_ proximity: CLProximity) -> String { switch proximity { case .immediate: return "非常に近い" case .near: return "近い" case .far: return "遠い" default: return "不明" } } } |
BeaconDetector.swift
2.Beacon検知用のファイルを作成します。
|
1 2 3 4 5 6 7 8 9 10 11 12 13 14 15 16 17 18 19 20 21 22 23 24 25 26 27 28 29 30 31 32 33 34 35 36 37 38 39 40 41 42 43 44 45 46 47 48 49 50 51 52 53 54 55 56 57 58 59 60 61 62 63 64 65 66 |
import SwiftUI import CoreLocation class BeaconDetector: NSObject, ObservableObject, CLLocationManagerDelegate { private var locationManager: CLLocationManager? let beaconUUID = UUID(uuidString: "12345678-1234-1234-1234-123456789ABC")! let identifier = "com.example.myBeacon" @Published var distance: CLProximity = .unknown @Published var accuracy: Double = -1.0 override init() { super.init() locationManager = CLLocationManager() locationManager?.delegate = self // 必ずこのタイミングで許可を求める checkLocationAuthorization() } private func checkLocationAuthorization() { switch CLLocationManager.authorizationStatus() { case .authorizedAlways, .authorizedWhenInUse: print("Location authorized") case .notDetermined: locationManager?.requestWhenInUseAuthorization() default: print("Location not authorized") } } func startScanning() { guard CLLocationManager.isMonitoringAvailable(for: CLBeaconRegion.self) else { print("ビーコン監視がサポートされていません。") return } let beaconRegion = CLBeaconRegion(uuid: beaconUUID, identifier: identifier) locationManager?.startMonitoring(for: beaconRegion) locationManager?.startRangingBeacons(satisfying: beaconRegion.beaconIdentityConstraint) print("ビーコン監視・レンジングを開始しました。") } func locationManager(_ manager: CLLocationManager, didRange beacons: [CLBeacon], satisfying beaconConstraint: CLBeaconIdentityConstraint) { if let beacon = beacons.first { distance = beacon.proximity accuracy = beacon.accuracy print("ビーコンを検出: 距離=\(accuracy)m, proximity=\(distance.rawValue)") } else { distance = .unknown accuracy = -1.0 print("ビーコンが見つかりませんでした。") } } func locationManager(_ manager: CLLocationManager, didFailWithError error: Error) { print("位置情報の取得に失敗: \(error.localizedDescription)") } func locationManagerDidChangeAuthorization(_ manager: CLLocationManager) { checkLocationAuthorization() } } |
3.Info.plistに以下の権限を追加します。
・「Privacy – Bluetooth Always Usage Description」
・「Privacy – Location Always and When In Use Usage Description」
・「Privacy – Location When In Use Usage Description」
スマホ(iBeacon用)
先ほどのものとは別にプロジェクトを作成して実装していきます。
ContentView.swift
1.UI表示用のSwiftファイルを作成します。
|
1 2 3 4 5 6 7 8 9 10 11 12 13 14 15 16 17 18 19 20 21 22 23 24 25 26 27 28 |
import SwiftUI struct ContentView: View { @StateObject private var broadcaster = BeaconBroadcaster() var body: some View { VStack(spacing: 20) { Text(broadcaster.isBroadcasting ? "ビーコン発信中" : "ビーコン停止中") .font(.title) .foregroundColor(broadcaster.isBroadcasting ? .green : .red) Button(action: { if broadcaster.isBroadcasting { broadcaster.stopBroadcasting() } else { broadcaster.startBroadcasting() } }) { Text(broadcaster.isBroadcasting ? "停止する" : "発信する") .padding() .foregroundColor(.white) .background(broadcaster.isBroadcasting ? Color.red : Color.blue) .cornerRadius(10) } } .padding() } } |
BeaconBroadcaster.swift
2.iBeaconとして発信するためのファイルを作成します。
|
1 2 3 4 5 6 7 8 9 10 11 12 13 14 15 16 17 18 19 20 21 22 23 24 25 26 27 28 29 30 31 32 33 34 35 36 37 38 39 40 41 42 |
import SwiftUI import CoreBluetooth import CoreLocation class BeaconBroadcaster: NSObject, ObservableObject, CBPeripheralManagerDelegate { var peripheralManager: CBPeripheralManager? let beaconUUID = UUID(uuidString: "12345678-1234-1234-1234-123456789ABC")! let major: CLBeaconMajorValue = 1 let minor: CLBeaconMinorValue = 1 let identifier = "com.example.myBeacon" @Published var isBroadcasting = false override init() { super.init() peripheralManager = CBPeripheralManager(delegate: self, queue: nil) } func peripheralManagerDidUpdateState(_ peripheral: CBPeripheralManager) { if peripheral.state == .poweredOn { startBroadcasting() } else { stopBroadcasting() } } func startBroadcasting() { guard peripheralManager?.state == .poweredOn else { return } let beaconRegion = CLBeaconRegion(uuid: beaconUUID, major: major, minor: minor, identifier: identifier) let beaconPeripheralData = beaconRegion.peripheralData(withMeasuredPower: nil) as? [String: Any] peripheralManager?.startAdvertising(beaconPeripheralData) isBroadcasting = true } func stopBroadcasting() { peripheralManager?.stopAdvertising() isBroadcasting = false } } |
3.Info.plistに以下の権限を追加します。
info.plistに
「Privacy – Bluetooth Always Usage Description」を追加。
起動してみた!
お待ちかね!
両方のスマホでアプリ起動です!
(iBeacon側)
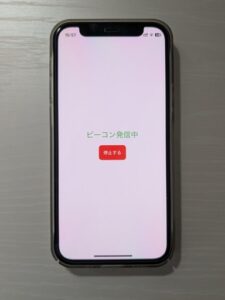
スマホから信号を発信しています。この信号を検知側のスマホが検知して、どれぐらいの距離にあるのか見つけるわけです。
さあ、見つかるのでしょうか?
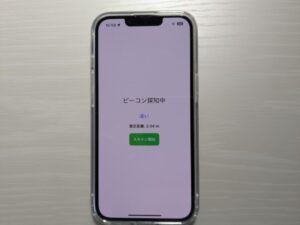
おお!遠いながらに近くにiBeacon(スマホ)があるそうです!その距離2.04m。
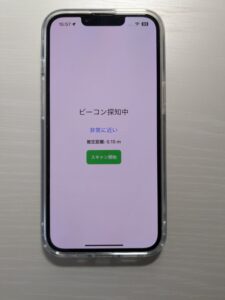
もう少しとのこと。表示が「非常に近い」に切り替わりました。その差0.15mです。
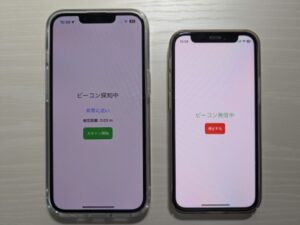
見事に発見です!
距離も0.03m。
かなり縮まっていることがわかりますね。
まとめ
スマホをiBeacon化し、距離を測ることで、無事にiBeacon(スマホ)を発見することができました。
今回使ったライブラリはCore Locationです。
このライブラリにiBeacon検知によるコールバックの呼び出しや、iBeaconとの距離などを測る機能が詰め込まれています。
iBeaconがスマホの一定の距離の近くに現れた・抜け出したに応じてコールバックを受け取ることもできます。(didEnterRegion・didExitRegionというコールバックを使用します)
まだまだiBeaconの仕組みの奥は深い!
さらに発見があればまたお伝えできればと思います。
弊社ではIoTに関連した、様々な案件にチャレンジすることができます。
ぜひ一緒にこれからの未来を作っていきませんか?
最後までご覧いただき、ありがとうございました!